
Changing a Radiator
Here, we have prepared a useful guide for you to change a radiator yourself, or you can use some of this information if you want to remove the radiator to decorate.
Before you Start
Prepare the work area, dustsheets down, peel the carpet back if necessary, clear any furniture in the way. Turn the boiler and central heating off!! Lay dustsheets between the old radiator and the doorway to outside, water in radiatiors can be messy!. Have an old bowl at hand and some old towels just in case.
Tools for the Job
• Valve Allen keys to suit valve tails
• Spirit level, 1200mm
• Steel measuring tape
• Combination try square or straight edge
• Pencil
• Small bowl or dish
• Wire brush
• Bucket
• Old towels
• Polythene sheet
• Dust sheets
• Power Drill
• Screwdrivers
• PTFE Tape
• Adjustable Spanner
• Waterpump pliers to support valve when turning nuts
Isolate the Water to the Radiator
 |
|---|
1 Tighten down the manual control valve clockwise until it is well seated (F2), if you have a thermostat valve see below. Do not overtighten as you may snap the valve spindle!
2 Remove the cap from the lockshield valve, then tighten down the spindle clockwise. Note how many turns this takes, later you will need to open it by the same amount (F3).
3 Place the towels around the pipe and a small bowl under the valve.
4 Loosen the bleed valve with a radiator key, then unscrew the union nut that holds the valve onto the radiator. Unscrew this union very slowly to make sure the valves have shut off properly, remember to support the valve with tools at all times when unscrewing. Be prepared to tighten it when the bowl fills. Have a bucket handy into which you can empty the bowl.
5 When the radiator is empty, undo the cap-nut on the other valve. Carefully lift the radiator off its brackets and
tip the remaining water into the bucket. The water may be very very dirty so be prepared. If the radiator is large and heavy, get someone to help you.
Thermostatic Radiator Valves Take Note
If the radiator is fitted with a thermostatic valve, you have two options. Either make sure the valve is fully turned to the off position, or zero, otherwise fit the decorators cap. Remove the sensor by unscrewing the knurled nut. In place of the sensor, use the special screw-down plastic decorators cap sometimes supplied with the valve. This will shut off the valve (F4). Not all thermostats are supplied with decorators caps.
Fitting a Replacement Radiator
 |
|---|
To fit different brackets;
Compare the new brackets, supplied with the radiator, with the old ones. If they are the same, hang the new
radiator on the old brackets. If the old ones are rusty or damaged, swap them for the new brackets.
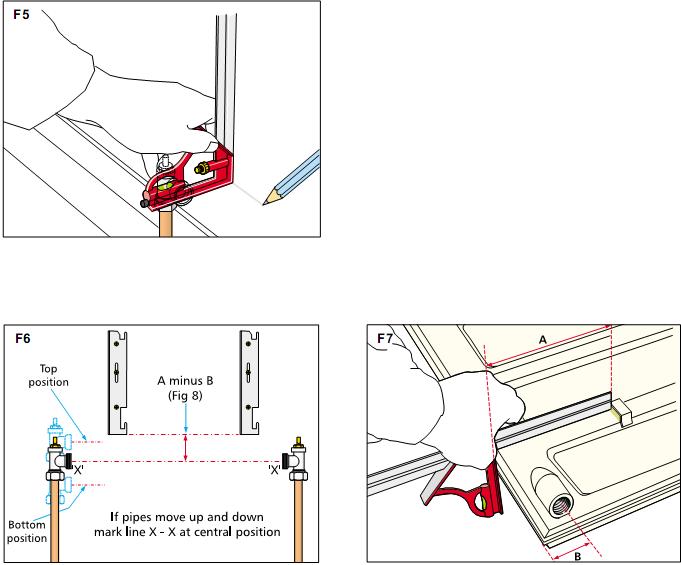
1 Mark points on the wall level with the horizontal centres of the valves (F5).
2 Draw a line between the two points.
3 Mark onto this line the position of the brackets and use a spirit level to draw vertical lines at these points (F6).
4 Lay the new radiator face down and place a bracket in position on the support lugs (F7).
5 Using a combination try square, measure from the bottom of the radiator to the bottom of the bracket (F7A).
6 Measure from the bottom of the radiator to the centre of the valve tail tapping’s threaded socket (F7B).
7 Subtract distance B from distance A. The difference gives you the position of the bottom of the bracket above
the centre line of the valves (F6).
8 Align the brackets.
9 Position the first bracket and mark the slotted fixing points.
10 Drill the wall, insert plugs and screw the bracket to the wall. Repeat for the other brackets.
11 Mark the position of the round fixing holes. Drill and plug these, then screw the brackets to the wall.
 |
|---|
Connect up the Radiator
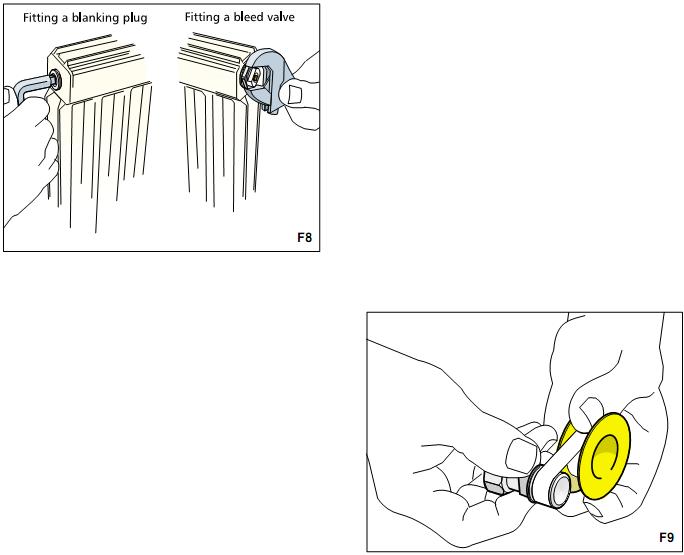
1 Fit the blanking plug supplied into the top tapping at the manual (wheel valve) end of the radiator (F8).
2 Fit the bleed valve into the opposite top end (F8).
NOTE
If the plug and bleed valve are not fitted with rubber ‘O’ rings, wrap PTFE tape round the threads. Most modern
bleed valves and plugs are inserted using a spanner. Some, however, require a special hexagonal key.
3 Centralise the radiator between the valves. If the new radiator is more than 5mm shorter than the old one, go to the next section.
4 Remove the tails from the old radiator using a suitable spanner or key. Some tails use the flats to be unscrewed anticlockwise, some use a hexagonal key inserted into the tail and unscrewed anticlockwise. If these prove difficult to shift, apply penetrating oil and leave for 30-40 minutes, then try again. Alternatively, heat applied with a hot air gun may soften the joint paste.
5 Use a brass wire brush to thoroughly clean the threads on the tails.
6 Make sure the cap-nut is on the tail and is the correct way round. Starting at the tail end, wrap PTFE tape
round the thread, overlapping by a suitable amount(F9). If you are using multi wrap, normally in a white roll, then roughly 10 wraps should be suffice. If you're using single wrap PTFE, in a yellow casing normally 5 wraps is enough.
7 Insert the tails into the tappings and tighten them home.
8 Tighten the union nuts onto both valves, remember to support the valves with suitable tools as you tighten the union nuts to the radiators.
9 Close the bleed valve and open both radiator valves, undoing the lockshield valve by the same number of
turns used to close it.
10 Use the bleed valve to release any trapped air.
Changing Valves and Fitting Non Standard Tails
 |
|---|
1 Having drained the system and removed the old radiator, fit the new radiator to the wall. Its base should be
between a minimum of 114mm and up to 200mm off the floor.
2 Fit the top blanking plug and bleed valves (F8).
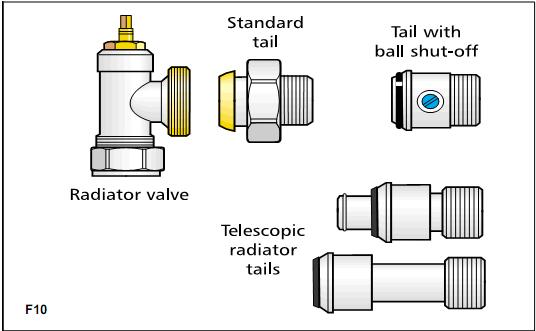
3 Measure the distance between the radiator and the valves. You may now decide what type of tails to use.
A standard tail is 15 to 20mm and an adjustable extension tail is 30 to 45mm (F10).
4 Fit the most suitable combination of tails (F5 and F6), which must be compatible with the new valves.
5 Remove the old valve, and fit the new valve complete with nut and olive. You may need to hacksaw the old olive from the pipe to remove the nut. This can be done by making a small cut slit through the oilive then using a screwdriver you can open up the slit an pull the oilve and nut off.
6 Connect the new valves and the radiator tails.
7 Top up inhibitor and refill the system
8 Check for leaks.
Remember to top up your inhibitor!
Inhibitor for Tanks |
|---|

This can be poured straight into your small header tank in the loft, before filling the system
Inhibitor for Combis |
|---|

This can be injected into your system via a radiator, or the filling loop, using a standard caulking gun, instructions are provided in the box.
